
Choosing the Right Insect Killer for Your Space
Understanding Different Types of Insect Killers – Overview of UV light traps, electric zappers, propane traps, and chemical options
Choosing the right insect killer for your space is more than just a matter of preference; it’s a strategic decision that impacts your comfort and health. Did you know that in South Africa, insect-borne diseases are a persistent threat, making effective pest control essential? With numerous options available, understanding the different types of insect killers can help you make an informed choice for optimal insect killer installation.
UV light traps and electric zappers are popular for their chemical-free operation, attracting insects with light and zapping them on contact. Propane traps, on the other hand, are ideal for larger outdoor areas, emitting carbon dioxide to lure pests like mosquitoes. Chemical options, though effective, require careful handling and proper installation to ensure safety. When considering insect killer installation, think about your specific environment—whether indoor or outdoor—and the pest species you aim to control. Selecting the appropriate device isn’t just about eliminating insects; it’s about creating a safer, more comfortable space with minimal fuss.
Factors to Consider Before Installation – Room size, insect types, safety requirements, and power sources
Choosing the perfect insect killer for your space isn’t just about flicking a switch and hoping for the best — it’s a strategic dance that involves size, pest type, and safety protocols. South Africa’s pest landscape is as lively as a marketplace, with mosquitoes and flies ready to crash your indoor party or invade your outdoor picnic. Before diving into insect killer installation, assess your environment with the precision of a seasoned detective.
Room size plays a starring role. A small, cozy lounge might only need a compact electric zapper, while sprawling outdoor areas call for robust propane traps. Insect types matter too; mosquitoes are highly attracted to carbon dioxide, making propane traps or UV light traps ideal choices. Safety requirements shouldn’t be an afterthought — especially if children or pets are involved. Prioritize devices with protective covers or automatic shut-offs to keep everyone safe while you conquer the pest invasion.
Power sources are another crucial factor. Will your setup rely on mains electricity, or are you considering portable options powered by batteries or even solar energy? For seamless insect killer installation, ensure your electrical outlets are conveniently located, and your chosen device matches your power supply. Remember, the goal isn’t just to eliminate insects but to do so efficiently and safely — because nothing kills the mood faster than a poorly installed pest trap.
Top Brands and Models – Comparative analysis of popular insect killer units
Choosing the right insect killer for your space can feel like navigating a labyrinth of options. In South Africa’s vibrant pest landscape, top brands and models stand out for their reliability and effectiveness. Well-known brands like Gardigo, Black Flag, and Pestrol have earned their reputation for crafting units that blend innovation with durability. Each offers a range of models tailored to different needs, from compact indoor units to heavy-duty outdoor traps.
When comparing popular insect killer units, consider their unique features. UV light traps from Pestrol attract insects with high-intensity illumination, making them ideal for indoor spaces. Electric zappers like Black Flag’s models deliver a quick zap, perfect for busy households. For outdoor areas, propane traps from Gardigo harness carbon dioxide to lure pests over larger distances.
- Match the device to your environment’s size and pest type.
- Prioritize safety features, especially if children or pets are around.
- Ensure compatibility with your power source—be it mains electricity, batteries, or solar energy.
Insect killer installation isn’t just about placing a device; it’s about integrating a strategic solution that aligns with your space’s unique demands. Selecting the best model from reputable brands guarantees your pest control efforts are both effective and seamless—because in the battle against pests, quality matters.
Preparing for Insect Killer Installation
Assessing the Installation Area – Identifying strategic locations for maximum effectiveness
When embarking on insect killer installation, precision in selecting the right location can make the difference between a pest-free sanctuary and an ongoing battle. In South Africa’s diverse climate, insects are cunning, often finding hidden niches to thrive. The key is to identify strategic spots where insects are most active, typically near entry points or breeding grounds. Proper placement not only enhances the insect killer’s effectiveness but also ensures safety and convenience for household members.
Assessing the installation area involves a keen eye—look for areas with high insect traffic, such as near doors, windows, and dark corners. To optimize results, consider these factors:
- Proximity to water sources or food waste
- Accessibility for maintenance
- Placement height—most insects are attracted to light at eye level or slightly above
By carefully evaluating these aspects, you can ensure that your insect killer installation targets pests effectively while seamlessly integrating into your environment. This strategic approach transforms a simple setup into a formidable line of defense against unwelcome guests!
Gathering Necessary Tools and Supplies – Screwdrivers, mounting brackets, electrical safety gear
Embarking on insect killer installation requires more than just unboxing the unit. To ensure safety and maximum effectiveness, gathering the right tools and supplies beforehand is essential. A well-prepared setup can mean the difference between a pest-free home and a persistent battle with insects. In South Africa’s climate, insects are resourceful, often hiding in dark corners and near entry points, making precise installation crucial.
Start with the basics: a reliable screwdriver, mounting brackets suitable for your insect killer model, and electrical safety gear such as gloves and insulated tools. These items not only facilitate a smooth installation process but also protect you from potential electrical hazards. For added efficiency, consider assembling a checklist of items needed, including:
- Power drill (if required for mounting)
- Extension cords or power adapters
- Wall anchors for secure mounting
Preparing your tools in advance ensures your insect killer installation proceeds without unnecessary delays, creating a seamless barrier against unwelcome pests while prioritizing safety and convenience throughout the process.
Ensuring Safety Precautions – Power shut-off procedures and safety protocols
Preparing for insect killer installation is an essential step that shouldn’t be overlooked—after all, safety is no joke when dealing with electrical devices. Before you dive into mounting your insect killer, it’s crucial to shut off the power at the main circuit breaker. This simple act prevents any nasty surprises or jolts that could turn your DIY project into a shocking ordeal.
Once the power is off, double-check that the device is unplugged, and wear electrical safety gear like insulated gloves and safety glasses. These precautions safeguard you from potential hazards, especially in South Africa’s humid climate where insects are relentless and electrical mishaps are best avoided.
Remember, a thorough safety protocol isn’t just about avoiding injury; it ensures your insect killer installation is both effective and secure. Taking these precautions sets the foundation for a pest-free home—without risking a jolt or a trip to the emergency room.
Step-by-Step Insect Killer Installation Guide
Mounting the Insect Killer – Wall or ceiling mounting instructions
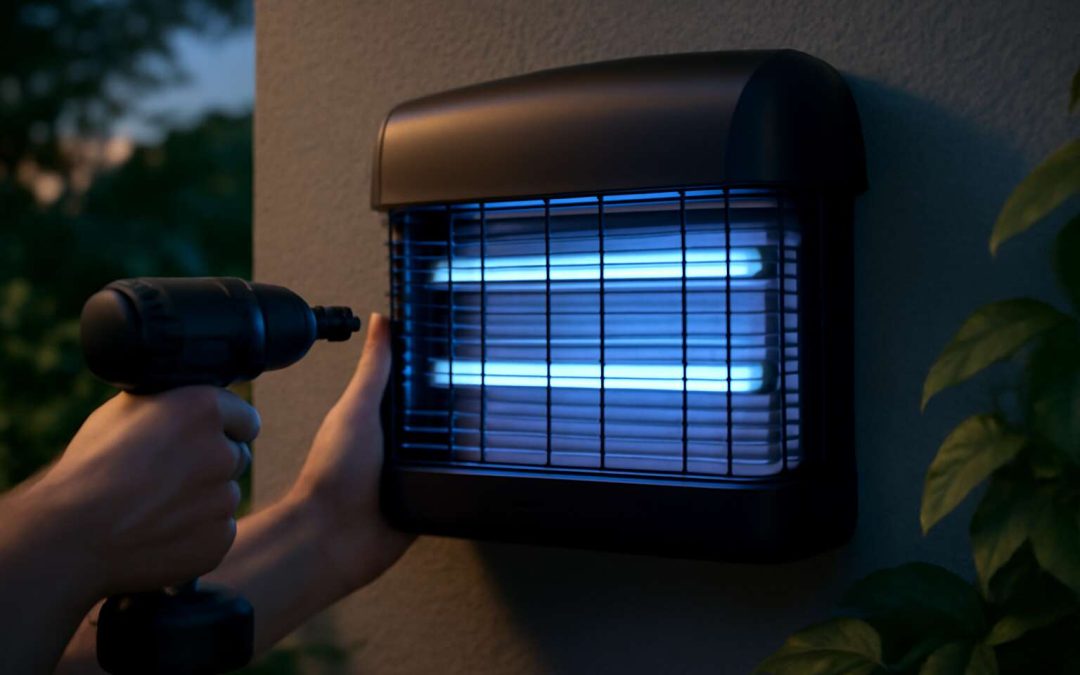
Once you’ve chosen the optimal location for your insect killer, the next crucial step is mounting it securely to ensure maximum effectiveness and safety. Proper wall or ceiling mounting not only guarantees stability but also enhances the insect killer’s ability to attract pests with its light or scent. Remember, the key to successful insect killer installation lies in strategic placement—ideally near entry points or high-traffic areas where insects are most likely to congregate.
Before beginning, gather all necessary tools—such as screwdrivers, mounting brackets, and safety gear—making the process smooth and efficient. Start by marking the mounting points on the wall or ceiling, ensuring they’re level and aligned with the device’s mounting holes. Use a spirit level for precision. Then, drill the appropriate holes and secure the brackets firmly with screws. For added safety, double-check that the insect killer is stable and not at risk of falling, which could create hazards or reduce its efficacy.
Remember, the installation height can significantly influence how well the insect killer performs. Typically, positioning it 1.5 to 2 meters above the ground is ideal for most indoor environments. For outdoor applications, consider the prevailing wind patterns and insect flight paths. Whether mounting on a wall or ceiling, a thoughtful approach to insect killer installation can make all the difference in creating a pest-free space that feels both welcoming and secure.
Power Supply Connection – Proper wiring and socket requirements
Power supply connection is a critical step in the insect killer installation process. Ensuring proper wiring guarantees the device operates safely and effectively. Always start by turning off the main power supply to avoid electrical hazards. Check the voltage requirements of your insect killer and compare them to your socket specifications. Using the correct socket type is essential for safety and efficiency. If your insect killer requires a plug, verify that it fits snugly without strain or exposed wiring.
For models that involve direct wiring, follow the manufacturer’s instructions meticulously. Typically, the wiring involves connecting the live, neutral, and earth wires to designated terminals. It’s wise to use a multimeter to double-check connections before powering on the device. If you’re unsure about electrical connections, consult a qualified electrician. Proper wiring not only ensures safety but also maximizes the insect killer’s lifespan and performance.
- Turn off the power at the main circuit breaker.
- Connect the power cord to the device’s terminal block, matching live and neutral wires correctly.
- Secure all wiring with appropriate connectors and ensure no loose strands remain.
- Double-check connections with a multimeter for continuity and correct polarity.
- Restore power and test the insect killer for proper operation.
Remember, following the correct socket requirements and wiring standards is vital for a safe and durable insect killer installation. Proper power supply connection ensures you enjoy a pest-free environment without risking electrical mishaps.
Placement Tips for Optimal Efficiency – High-traffic insect zones and outdoor vs indoor considerations
Strategic placement is the secret ingredient in maximizing your insect killer installation’s effectiveness. In high-traffic zones—think doorways, kitchen entrances, and outdoor patios—these devices can dramatically reduce pest activity. When positioning your insect killer, consider the natural flight paths of insects: they’re often drawn to light sources or food smells, so placing the device near these attractants can deliver swift results.
Outdoor versus indoor installation requires different tactics. Indoors, locate the insect killer in dark, sheltered corners away from human activity, ensuring it’s unobtrusive yet accessible. Outdoors, mounting the device higher on walls or under eaves creates an optimal barrier against pests without obstructing daily activities. Remember, the right placement not only boosts efficiency but also prolongs the lifespan of your insect killer.
- Identify high-traffic insect zones.
- Choose sheltered, unobstructed locations for indoor setups.
- Mount outdoor models higher on walls or under eaves for maximum coverage.
By understanding these placement tips during your insect killer installation, you’ll create an unassailable pest barrier that’s both discreet and highly effective. The right spot makes all the difference in keeping your environment pest-free and comfortable, no matter the season.
Testing and Troubleshooting Your Insect Killer
Initial Power-On and Function Check – Verifying operational status
Once your insect killer installation is complete, the next critical step is to ensure it hums to life with purpose and precision. Powering on the device for the first time can feel akin to awakening a guardian — vigilant and poised to protect. A thorough initial power-on and function check is essential to verify that your insect killer operates flawlessly and effectively.
Begin by switching on the unit and observing for immediate signs of activity. Should the insect killer installation include UV lights, verify they illuminate brightly, casting an inviting glow that draws in unwelcome pests. Electric zappers should produce a subtle hum, a testament to their readiness. If your model features a fan or trap mechanism, listen for smooth operation without unusual noise or vibration.
For optimal results, a systematic operational status check can be performed:
- Confirm the power supply is secure and correctly connected.
- Ensure the insect killer installation is free of obstructions that could hinder airflow or insect attraction.
- Test the device’s safety features, such as grounding and circuit protection, to prevent hazards.
Troubleshooting common issues—like non-activation or flickering lights—can often be remedied with simple adjustments or checks, ensuring your insect killer stands as a silent sentinel in your space. After all, a well-tested insect killer installation is the first line of defense against unwelcome intruders, safeguarding your home with unwavering vigilance.
Common Installation Issues – Fixing wiring problems, securing mounting brackets
Insect killer installation isn’t just about mounting a device; it’s about forging a silent alliance against the relentless intrusion of pests. Once the hardware is up, the true test begins—ensuring everything functions as intended. Troubleshooting common installation issues, particularly wiring problems and securing mounting brackets, can mean the difference between a vigilant guardian and a dormant, ineffective trap.
Wiring issues often lurk behind flickering lights or complete non-activation. Carefully inspect all connections, ensuring wires are securely fastened and insulated properly. Loose or frayed wiring can compromise safety and performance, so double-check every junction. Securing mounting brackets is equally crucial; a shaky installation can reduce the insect killer’s efficacy and pose safety risks. Use the appropriate tools and follow the manufacturer’s instructions diligently.
To simplify the troubleshooting process, consider this quick list:
- Verify power supply connections are stable and correct
- Check the integrity of wiring and replace damaged cables
- Ensure mounting brackets are tightly secured to prevent movement
- Test safety features, like grounding and circuit protection, to prevent hazards
Addressing these issues swiftly not only restores functionality but also reinforces the moral duty to safeguard your space. An insect killer installation, when properly maintained and troubleshot, becomes a resilient sentinel—standing unwavering in the fight against unwelcome intruders, day and night.
Maintenance Tips – Cleaning, replacing bulbs or traps, and safety checks
There’s a quiet dignity in maintaining a pest-free environment, and ensuring your insect killer installation functions flawlessly is vital to this pursuit. When an insect killer operates at peak performance, it becomes a silent guardian—an unwavering sentinel against unwelcome intruders. But even the most robust device can falter without proper testing and troubleshooting, revealing the importance of ongoing maintenance.
Cleaning components regularly, such as replacing bulbs or traps, keeps the device operating with precision. Over time, accumulated debris or worn-out parts diminish effectiveness and can even pose safety risks. It’s also wise to perform safety checks—test grounding and circuit protection to prevent hazards. A simple but essential step involves verifying that the power supply connections remain stable and intact, preventing unexpected failures in your insect killer installation.
In essence, diligent maintenance transforms a basic trap into an enduring barrier—one that guards your space with unwavering resolve. Through meticulous testing and troubleshooting, you deepen your understanding of the device’s inner workings, reinforcing your moral duty to preserve safety and comfort in your environment. After all, a well-maintained insect killer isn’t just an appliance; it’s a steadfast ally in the ongoing battle against pests.
Enhancing Insect Control Effectiveness
In the shadowed corners of our homes, where unseen armies of insects lurk, lies the secret to a peaceful sanctuary: masterful insect killer installation. Studies reveal that a well-placed insect killer can reduce pest populations by up to 80%, transforming your living space into a fortress of tranquility. Imagine an invisible guardian, tirelessly working to keep pests at bay—this is the magic of strategic insect killer installation.
To truly enhance the effectiveness of your insect control efforts, understanding the nuances of placement is key. The right installation not only maximizes coverage but also ensures that the insect killer’s light and scent draw in pests without unnecessary wastage. When installing your insect killer, consider factors such as airflow, proximity to breeding sites, and the natural pathways insects traverse. In doing so, you create a seamless barrier—an enchanted line of defense that pests find impossible to breach.
Remember, the environment plays a vital role in insect control. A well-installed insect killer can be complemented by routine maintenance, such as cleaning the collection trays and replacing bulbs regularly. These small acts keep the magic alive, ensuring your space remains pest-free and inviting for your family.